
Verify SSD Trim Support – It is Important!
You need to understand what TRIM does for your SSD drive, to appreciate why it is so important. You probably know your SSD drive is blazing fast at reading data, but not as fast at writing data. Here is why:
 When copying data to your new SSD it is copying to a blank space, so it is able to operate at full speed. When later some of this data is “deleted”, it is actually not erased, it is just marked as “not used”. When the OS requires more space it will simply overwrite this “not used” space.
A traditional hard disk drive is able to overwrite data in a single operation, but a solid state drive, which is usually made up of NAND-based flash memory, first has to erase all data in this “not used” space before it is able to record new data. This creates a problem, and slows down the write process. To make things worse, solid state drives are only able to delete data in relatively large 512 kB blocks, also slowing things down.
The TRIM operation is here to solve this problem. When you delete a file from your SSD, and the operating system has marked the file space as “not used”, and when your system has idle time, the TRIM command is sent to wipe all the “not used” space clean so that when your SSD drive needs to write data, it can do so just as it did when the drive was new.
This allows your SSD drive to skip the deletion process when performing write commands. If TRIM is not enabled, write operations will be significantly slower and the life of your SSD drive will be degraded.
Bottom line: The TRIM operation keeps your SSD drive operating at full speed (well almost), just as when the drive was new.
All modern SSD drives support the TRIM command as do Windows operating systems beginning with Windows 7 & and later. If you are like me, and since this is so very important, you will want to check to verify that TRIM is enabled. Here’s how: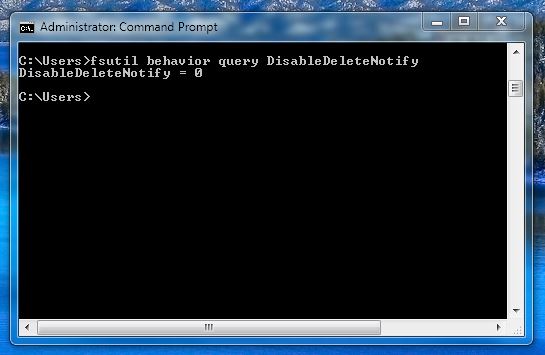
1: Open a Command Prompt window (run as administrator)
Click on Start button → Click All Programs → Accessories → Command Prompt
2: Type the following at command prompt and press enter:
fsutil behavior query DisableDeleteNotify
DisableDeleteNotify = 0 : TRIM is already enabled and working in Windows – You are done!
DisableDeleteNotify = 1 : TRIM is not enabled → BAD – simply execute the command as noted in step 3 to enable it.
3: To enable SSD TRIM support in Windows, type the following at command prompt and press enter:
fsutil behavior set DisableDeleteNotify 0
Now you can rest easy knowing that you are getting top performance out of your SSD drive, and that it will operate as it should for years to come!