
You Can Easily Delete All Partitions From a Hard Drive With This Procedure
When your hard drive is provided to you by the manufacturer, the preparation has already done by the drive manufacturer. If you buy a used hard drive, or want to change the partitions on a hard drive, sometimes the “Manage” function will not be able to delete or modify some of the partitions put there by the manufacturer. You can easily delete all the partitions on the hard drive with the process outlined below. Keep in mind, you will lose all data including any backup or system restore partitions put there by the manufacturer. This process will work with Windows 7 or 8, and probably with future windows versions as well.
Warning: The Disk Management process can easily destroy your partitions and result in loss of data. If you don’t feel comfortable here, get some help from someone who has experience in this area.
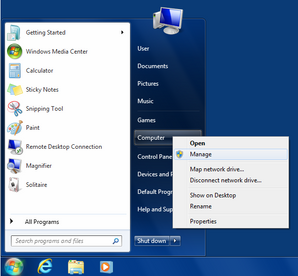 First check the Disk Management tool provided to you by windows, as normal disk management tasks can be handled here. To get to the Disk Management tool, click on the Start button, right-click on Computer, and choose Manage from the menu. In windows 8 you can search for “Manage Disk” and open “Create and Manage Hard Disk Partitions”.
After you have opened the Disk Management tool, wait for the Computer Management console to open. Select Disk Management in its navigation page. The list of disks that are attached to your computer will be displayed.
When using the Disk Management tool, make sure you double check the identify of the disk you want 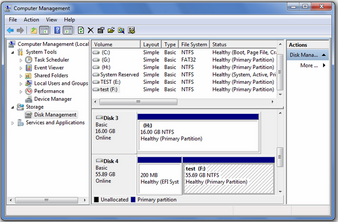 to manage in the list. Usually the size of the disk will help you in this identification process.
Note the disk number of the disk you want to manage. In our case, Disk 4 has two partitions, one is a 200MB EFI partition that has no drive letter assigned, and another NTFS partition, approximately the size of the hard drive. In our case this disk has the drive letter F: assigned to it. If you are working with a Windows 8 hard drive, you may see several partitions that do not have Drive letters assigned to them. These partitions will likely be protected.
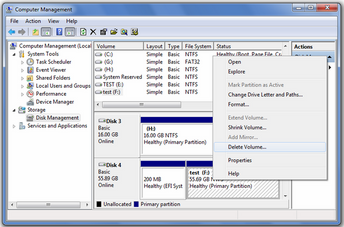 If you right-click on an NTFS partition, you will see the normal menu that will allow you do perform various tasks on that partition, including the Delete Volume command. You may note that some of the smaller partitions, appear to be locked and the menu is disabled. If you do, follow the process below.
Windows has a command line tool that allows you to take total control over your hard drive. This command is DISKPART. If you have never worked in the the command prompt before, it can be a bit daunting, but hang in there, you will find that it is not difficult.
To get access to the DISKPART command, first you will need to open the Windows command prompt in administrator mode. We can do that by clicking the Start button and entering cmd in the search box. You can also gain access to the command prompt through the Accessories menu. In the case of Windows 8 just search for Command.
NOTE: You will need to open the command prompt in the administrator mode. You can accomplish this task with the Right Click option or by pressing the Ctrl and Shift keys together and then clicking on the Command icon to open the command prompt.
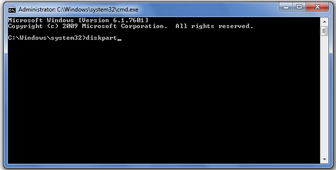 To start the DISKPART tool, enter the diskpart command into the command prompt window:
This should display the DISKPART command prompt. The first command we will need to provide is the list disk command. 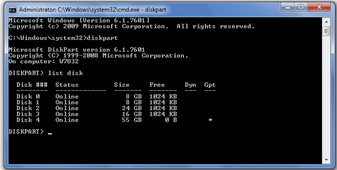 Type in list disk and press return. This will return a listing of all the disks currently connected to your computer. Here you will find Disk 4, which is the disk we identified earlier and the one that has the protected partition(s) that we want to remove.
The next step is to select this disk. We accomplish this by typing entering disk 4 and pressing return.
Once this command has been successfully entered, you need to double check that Disk 4 is selected. The selected disk will be noted by a * star character in front of the disk label.
 Now it is time to quickly delete all the partitions, including the protected ones on this drive. Remember if there are any files you want anywhere on this disk, exit the command prompt and save those files first.
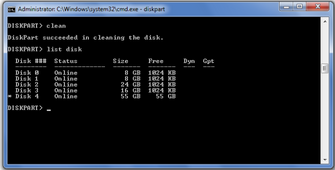
Again verify that disk 4 is selected and type in Clean and press return. Don’t blink as this will happen in a just a flash.
You now have a fresh disk with all the disk partitions erased. You can now exit the command prompt by typing exit and pressing return.
Now return to the Disk Management tool and you are ready to fully manage your disk. Disk management will automatically detects the presence of the clean disk and will prompt you to initialize it. Usually you will just need to create one partition on a new disk.
Once the new partition is created you will be given the option to format the disk. Usually the quick format option is sufficient. Once this is done, Windows will install this new drive in your system, and assign a drive letter. This drive is now ready for your use as a traditional hard drive.
Have fun becoming a power user and taking charge of your hard drives!